


It's clear to most users that Party Pro Manager is highly optimized to handle bookings that are relatively simple and straightforward (i.e. choosing from a short list of pre-defined packages with intentionally limited customization options).
But, what if you need to enable your clients to book you for multiple service types?
Good news! We have many happy and long-standing users that already provide their clients a mix of pre-defined packages and custom multi-service bookings (some of which are running hundreds of events a month!)
☝️Tip: Start simple
You can handle multi-service bookings within a single catalog by adding a dedicated “Multi-Service” Booking Pathway. Only split into multiple catalogs if you have a clear reason to separate offerings (e.g., separate brands/markets).
In this article, we'll explore 4 different methods you could use to achieve this 💪🥳
Before we dig into those 4 methods, it's also worth quickly noting that we have several improvements in the pipeline that will take all of this to the next level! (Those upcoming improvements include things like: Quantity-Based Choices, Build-a-Quote Features, and more!) Until those are ready, here are our best four methods to handle Multi-Service Bookings.
(going from simplest to most advanced)
Method 2: Simple Select Method
Method 3: Standard Options Method
Method 4: Advanced Options Method
Method 1: Notes Method
In this method, we use the simplest way to handle multi-service bookings. This is to simply request that your clients add notes about the services they'd like.
👉 See demo of the Notes Method in action
📥 Import a copy of this catalog into your account
(Note: Importing the sample catalog is optional — you can also build this inside your existing catalog)
Setup
Step 1: Create a new "Booking Pathway" for your Multi-Service events
- Go to "Catalogs" in the main menu
- Click the Catalog you want to edit to "Manage Catalog"
- Click the "+ BOOKING PATHWAY" orange button at the top of the page
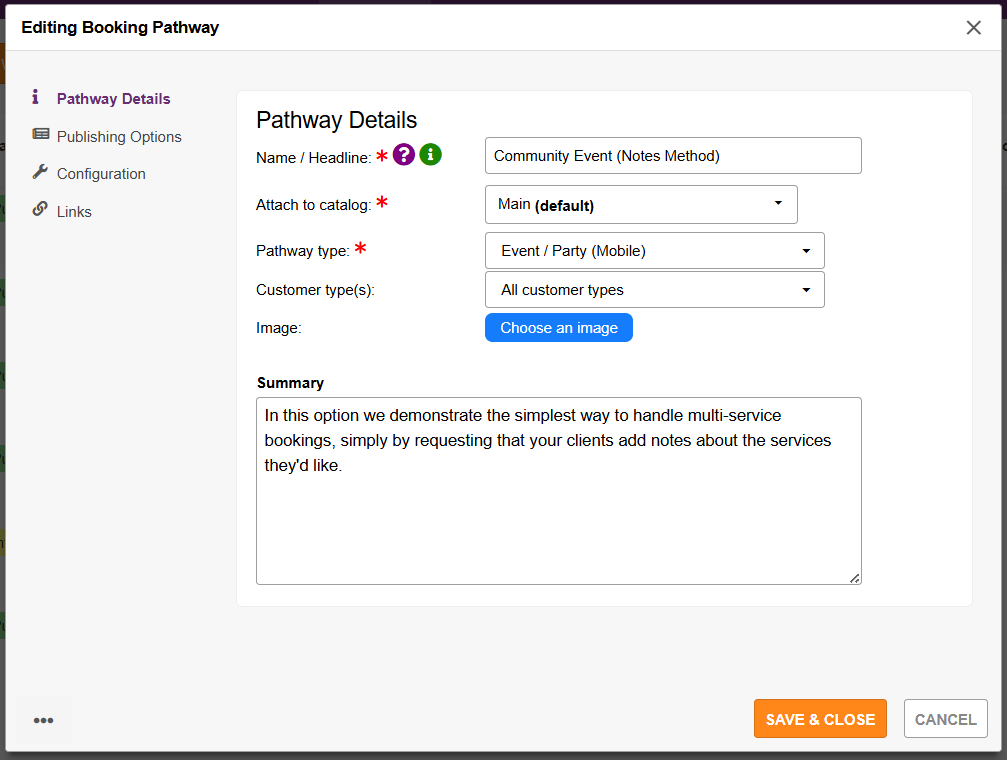
- Enter the "Name / Headline" for your new pathway option
- Select a "Pathway type" (as you see fit)
- Select customer types this pathway is for (as you see fit)
- Add a "Summary" to describe your new pathway
Step 2: Select your Publishing Options
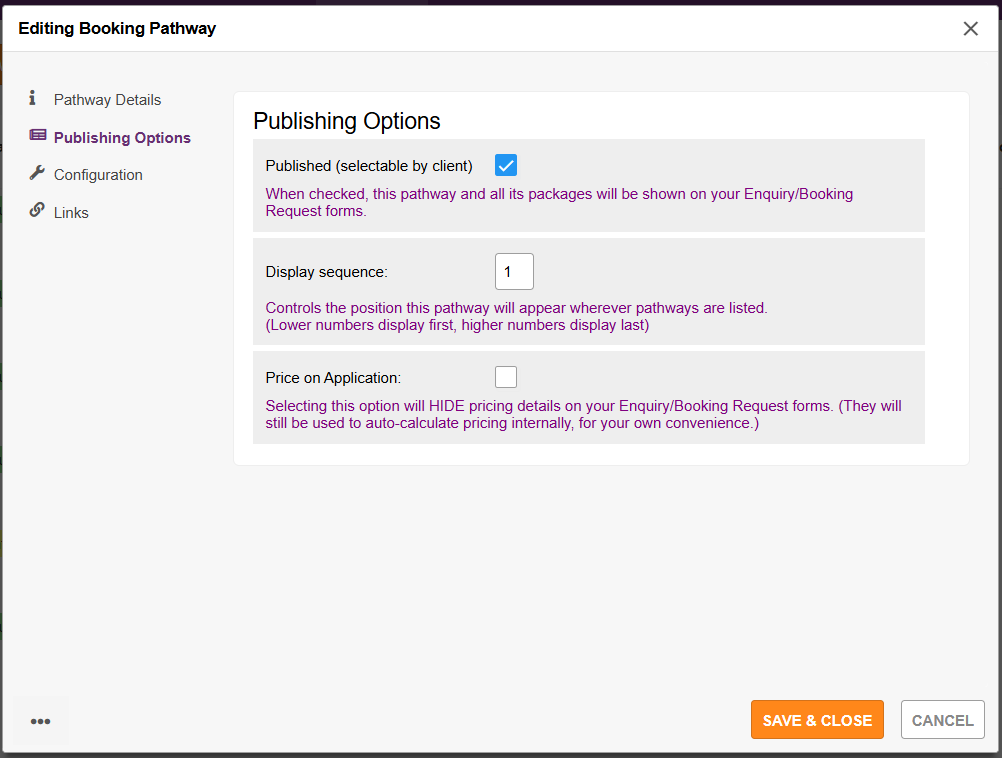
- Click "Publishing Options" in the left sidebar menu of the popup Editing Booking Pathway window
- Make sure the check box is checked for "Published (selectable by client)" so that your new pathway will appear on your live booking form when you are done
- Enter the display sequence so that this pathway appears in the right spot on your list of pathways. I've gone with 1 to place this one at the top (you can change this later)
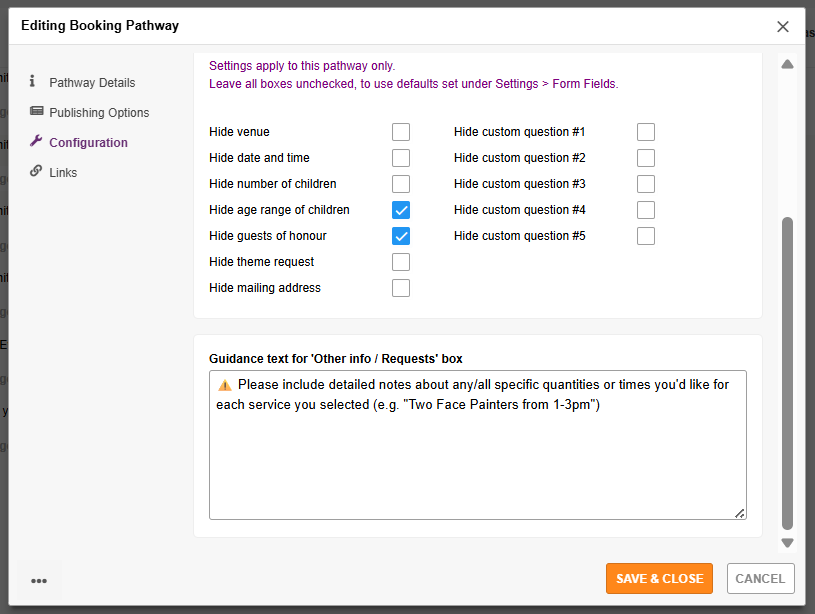
Step 3: Configure the display options for your new pathways
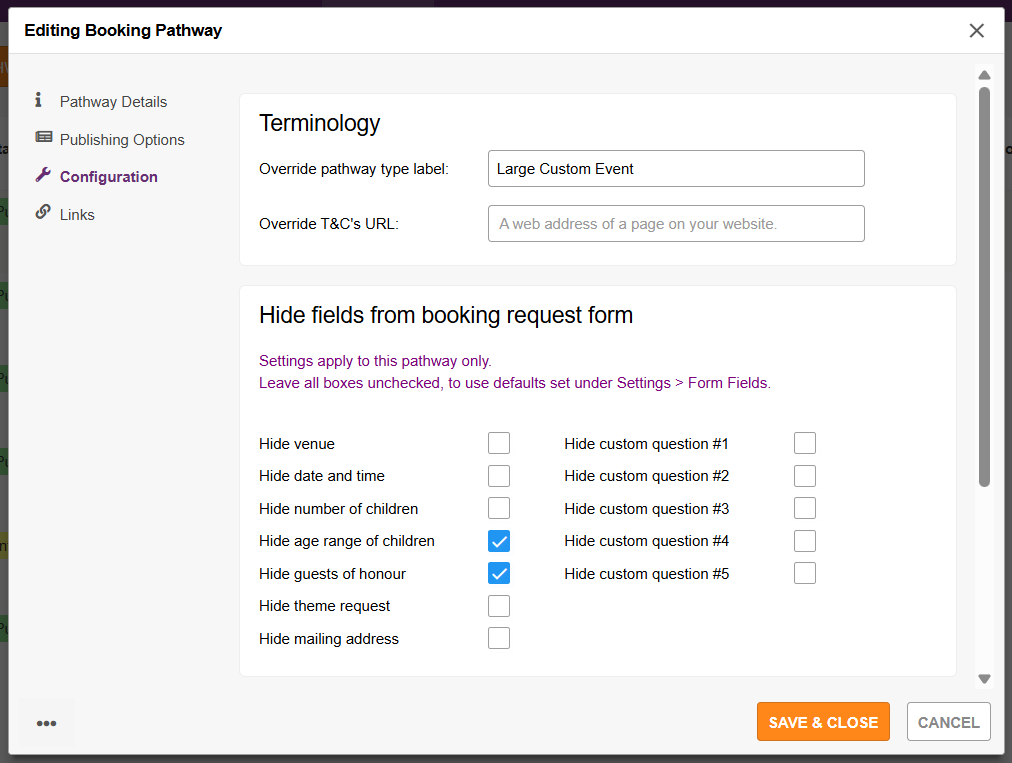
- Click "Configuration" in the left side bar menu of the popup
- Make any/all adjustments as you see fit
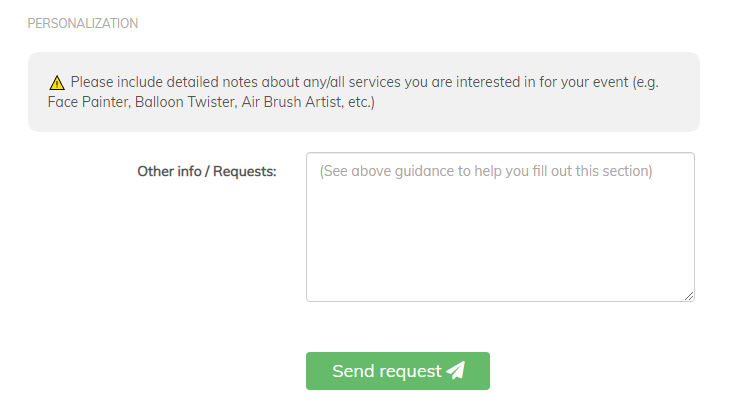
- Be sure to add in your "Guidance text for 'Other info / Requests' box"
- In our example, we've gone with: "⚠️ Please include detailed notes about any/all services you are interested in for your event (e.g. Face Painter, Balloon Twister, Air Brush Artist, etc.)"
Ongoing Admin
Let's imagine a request has come in and the client has provided the following in the Notes section along with their booking request:
"We'd like to have a Balloon Twister and Face Painter from 10am to 1pm for our event."
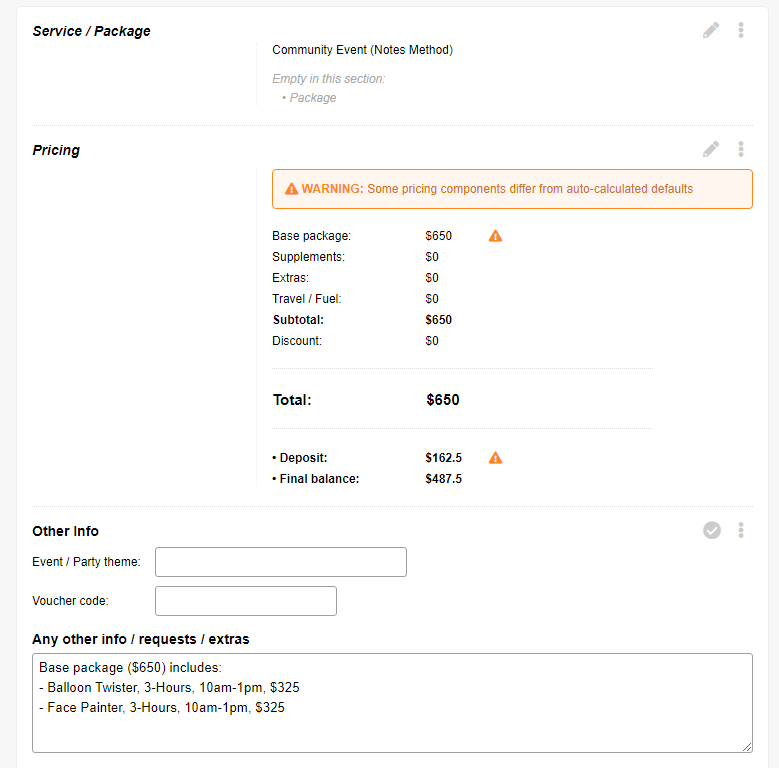
Here's how you'd handle the "Pathway / Package" and "Pricing" sections for the event within the PPM Admin area:
- Pathway / Package
- Keep it as is. That was easy :)
- Pricing
- Once you've manually calculated the price for the gig, based on the client's request and needs, add the price to the "Base Package" field
- Add any other specific entries to the Pricing Grid that are applicable (e.g. Travel Fee, Discount, Deposit, etc)
- Other Info
- Add a detailed breakdown of their quote to the "Any other info / requests / extras"
Method 2: Simple Select Method
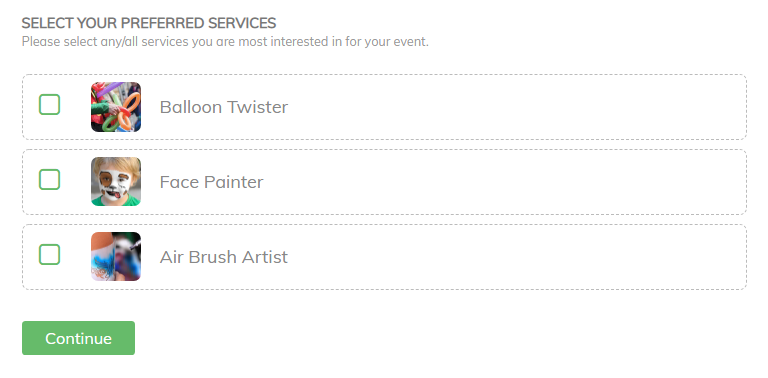
In this method, we use the 'Simple Select Method' to handle multi-service bookings. Using this method, we present your clients with a simple list of services to select from.
👉 See demo of the Simple Select Method in action
📥 Import a copy of this catalog into your account
(Note: Importing the sample catalog is optional — you can also build this inside your existing catalog)
Setup
Step 1: Create a new "Booking Pathway" for your Multi-Service events
- Go to "Catalogs" in the main menu
- Click the Catalog you want to edit to "Manage Catalog"
- Click the "+ BOOKING PATHWAY" orange button at the top of the page
- Enter the "Name / Headline" for your new pathway option
- Select a "Pathway type" (as you see fit)
- Select customer types this pathway is for (as you see fit)
- Add a "Summary" to describe your new pathway
Step 2: Select your Publishing Options
- Click "Publishing Options" in the left sidebar menu of the popup Editing Booking Pathway window
- Make sure the check box is checked for "Published (selectable by client)" so that your new pathway will appear on your live booking form when you are done
- Enter the display sequence so that this pathway appears in the right spot on your list of pathways. (you can always change this later)
Step 3: Configure the display options for your new pathways
- Click "Configuration" in the left side bar menu of the popup
- Make any/all adjustments as you see fit
- Be sure to add in your "Guidance text for 'Other info / Requests' box"
- In our example, we've gone with: "⚠️ Please include detailed notes about any/all specific quantities or times you'd like for each service you selected (e.g. "Two Face Painters from 1-3pm")"
Step 4: Add a Package to your pathway
- Next step is to add a single package to this pathway. Simply navigate to your Catalog in your PPM admin and hover over the new pathway you've added. A "+ PACKAGE" button will appear. Click to add a new package.
- Give the package a simple name, like "Custom Event", or "Large Event", etc.
- By creating only ONE package for this pathway, it will be auto-selected when the pathway is chosen by your clients.
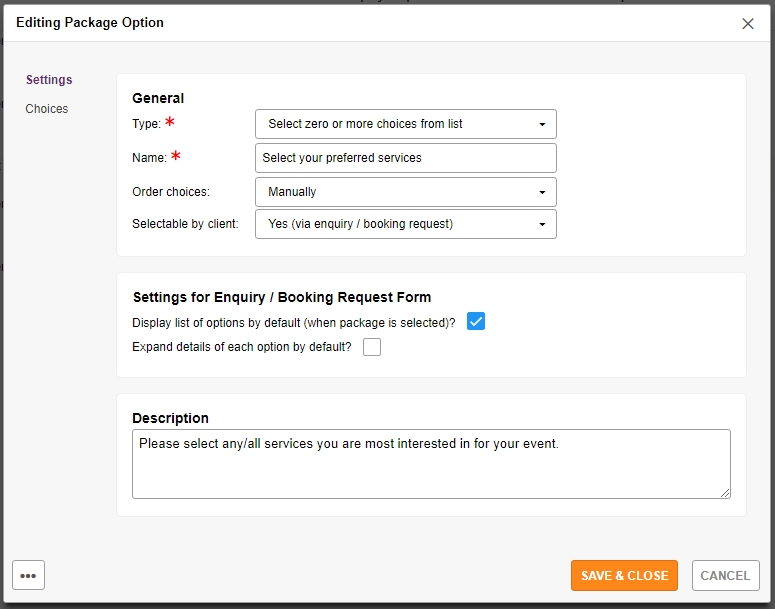
- Click on "Package Options" in the sidebar menu to create a list of services for your client to choose from
- Click the "+ PACKAGE OPTION" button, then create your Package Option (see sample settings in image below)
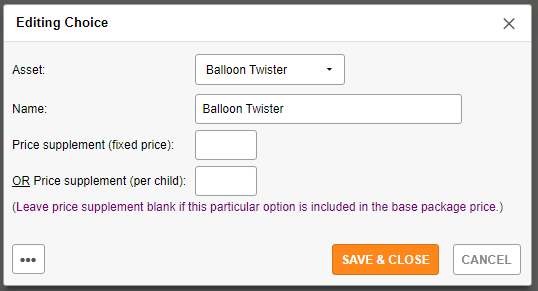
- Click "Choices" in the sidebar menu
- Click the "+ CHOICE" button to add a choice to the list for each service you offer
⚠ NOTE: If you haven't already, it is recommended that you first create an Asset for each service you offer. This will allow you to add an image to the choice, and will also enable you to run reports to see which events have booked this particular service.
Ongoing Admin
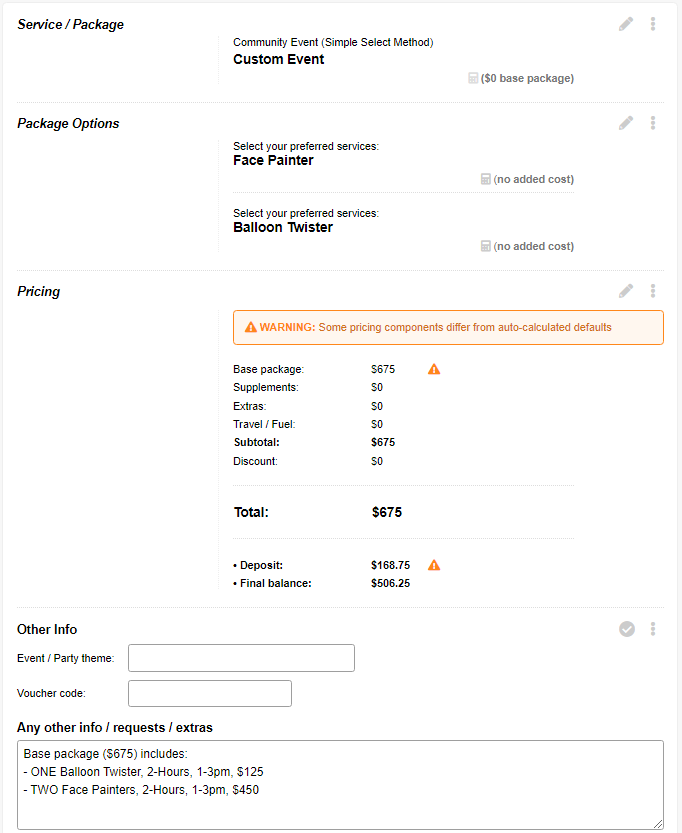
Let's imagine a request has come in and the client has selected "Balloon Twister" and "Face Painter" from the service selection list, plus they have added the following in the Notes section along with their booking request:
"We'd like to have one Balloon Twister and two Face Painters from 1-3pm"
Here's how you'd handle the "Pathway / Package" and "Pricing" sections for the event within the PPM Admin area:
- Pathway / Package
- Keep it as is. That was easy :)
- Pricing
- Once you've manually calculated the price for the gig, based on the client's request and needs, add the price to the "Base Package" field
- Add any other specific entries to the Pricing Grid that are applicable (e.g. Travel Fee, Discount, Deposit, etc)
- Other Info
- Add a detailed breakdown of their quote to the "Any other info / requests / extras"
Method 3: Standard Options Method
In this method, we use the 'Standard Options Method' to handle multi-service bookings. Using this method, we present your clients with your most standard options to select from to get the booking process started. You'll later customize the pricing and share a breakdown with the client.
👉 See demo of the Standard Options Method in action
📥 Import a copy of this catalog into your account
(Note: Importing the sample catalog is optional — you can also build this inside your existing catalog)
Setup
Step 1: Create a new "Booking Pathway" for your Multi-Service events
- Go to "Catalogs" in the main menu
- Click the Catalog you want to edit to "Manage Catalog"
- Click the "+ BOOKING PATHWAY" orange button at the top of the page
- Enter the "Name / Headline" for your new pathway option
- Select a "Pathway type" (as you see fit)
- Select customer types this pathway is for (as you see fit)
- Add a "Summary" to describe your new pathway
Step 2: Select your Publishing Options
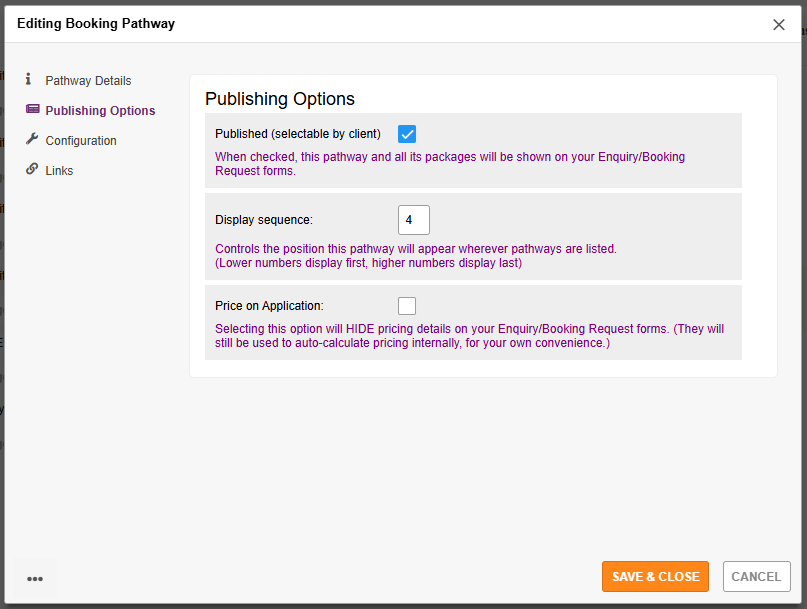
- Click "Publishing Options" in the left sidebar menu of the popup Editing Booking Pathway window
- Make sure the check box is checked for "Published (selectable by client)" so that your new pathway will appear on your live booking form when you are done
- Enter the display sequence so that this pathway appears in the right spot on your list of pathways. (you can always change this later)
- 🚨 Be sure to check "Price on Application" to enable you to hide your set default prices from your clients while they fill out your booking form
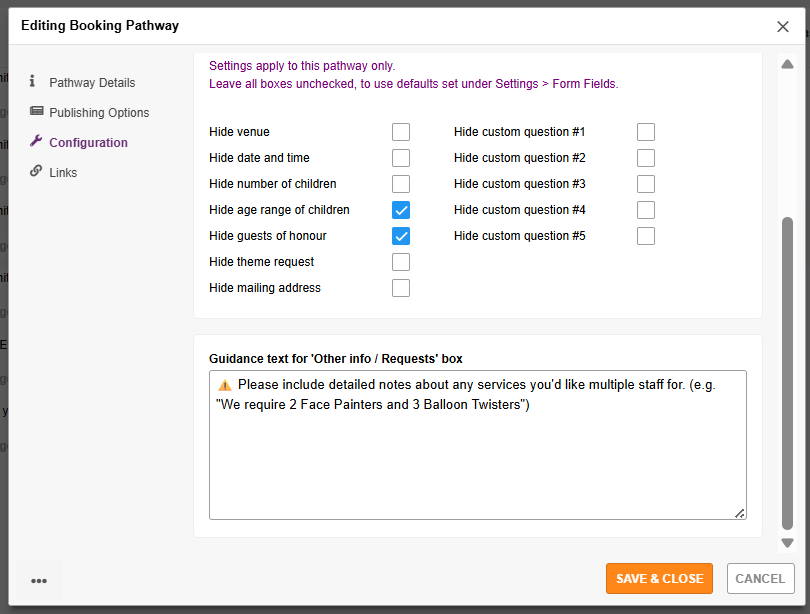
Step 3: Configure the display options for your new pathway
- Click "Configuration" in the left side bar menu of the popup
- Make any/all adjustments as you see fit
- Be sure to add in your "Guidance text for 'Other info / Requests' box"
- In our example, we've gone with: "⚠️ Please include detailed notes about any services you'd like multiple staff for. (e.g. "We require 2 Face Painters and 3 Balloon Twisters")"
Step 4: Add a Package to your pathway
- Next step is to add a single package to this pathway. Simply navigate to your Catalog in your PPM admin and hover over the new service you've added. A "+ PACKAGE" button will appear. Click to add a new package.
- Give the package a simple name, like "Custom Event", or "Large Event", etc.
- By creating only ONE package for this pathway, it will be auto-selected when the pathway is chosen by your clients.
- Click on "Package Options" in the sidebar menu to create a list of services for your client to choose from
- Click the "+ PACKAGE OPTION" button, then create a separate 'Package Option' for each different service you offer (see sample settings in image below)
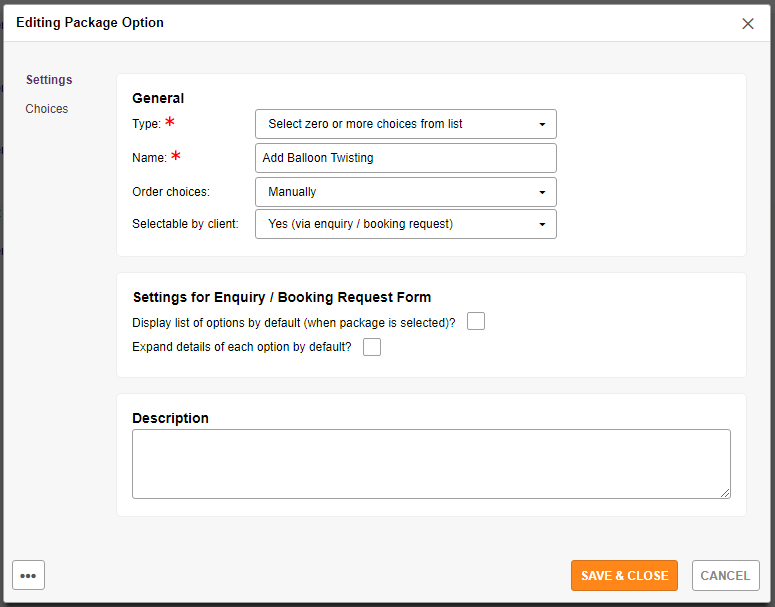
- Click "Choices" in the sidebar menu
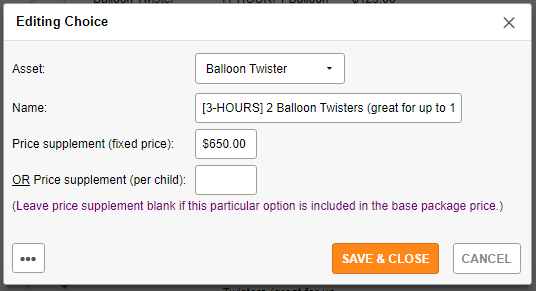
- Click the "+ CHOICE" button to add a choice for each standard option you offer for this particular service. (see sample settings in image below)
⚠ NOTE: If you haven't already, it is recommended that you first create an Asset for each service type you offer. This will allow you to add an image to the choice, and will also enable you to run reports to see which events have booked this particular service.

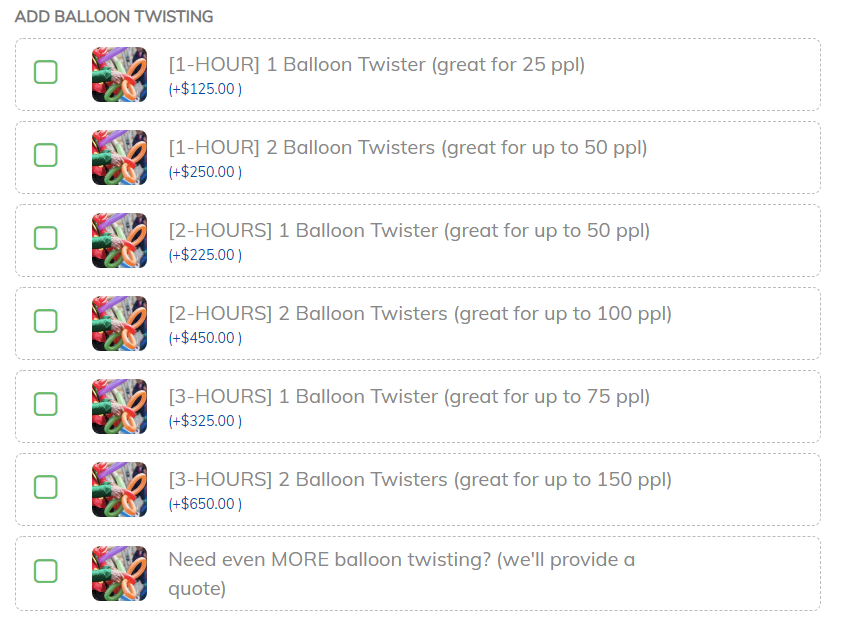
- After we've set up all our Standard Options for our Balloon Twister Package Option, it looks like this on our booking form
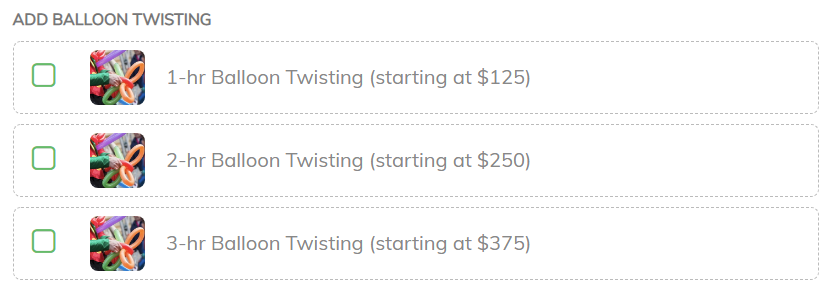
- Repeat this process for all service types you'd like to add to your booking form, first creating a Package Option, and then all the respective Choices needed.
Ongoing Admin
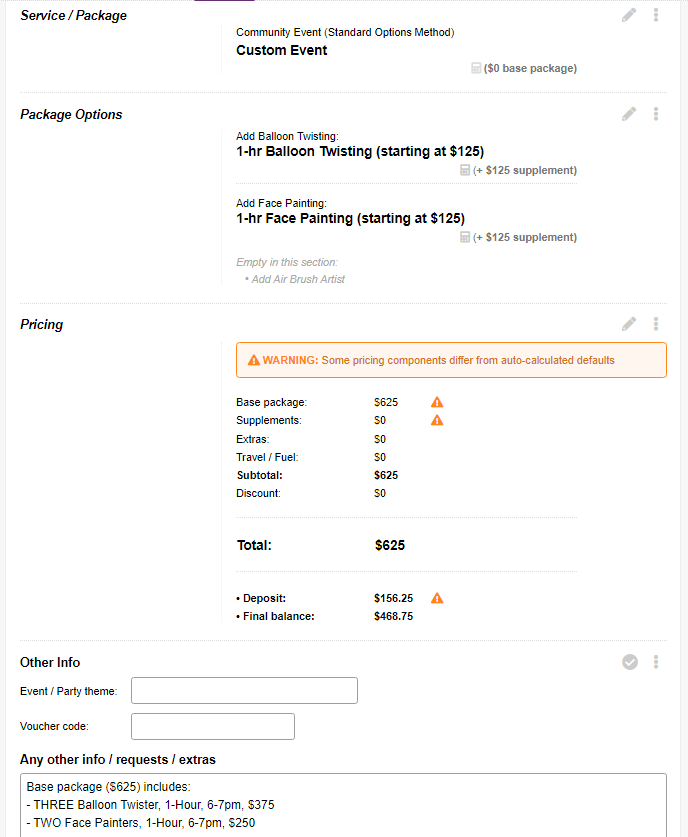
Let's imagine a request has come in and the client has selected "1-hr Balloon Twisting" and "2-hr Face Painting" from the standard options you provided, plus they have added the following in the Notes section along with their booking request:
"We'll require three Balloon Twister and two Face Painters from 6-7pm"
Here's how you'd handle the "Pathway / Package" and "Pricing" sections for the event within the PPM Admin area:
- Pathway / Package
- Keep it as is. That was easy :)
- Pricing
- Once you've manually calculated the price for the gig, based on the client's request and needs, add the price to the "Base Package" field, and clear amounts currently in "Supplements" field.
- Add any other specific entries to the Pricing Grid that are applicable (e.g. Travel Fee, Discount, Deposit, etc)
- Other Info
- Add a detailed breakdown of their quote to the "Any other info / requests / extras"
Method 4: Advanced Options Method
In this method, we use the 'Advanced Options Method' to handle multi-service bookings. Using this method, we present your clients with all of your main options to select from, which will also build a quote for your client in real-time as they fill in their Booking Request Form. You'll still be able to customize the pricing at a later stage if need be.
👉 See demo of the Advanced Options Method in action
📥 Import a copy of this catalog into your account
(Note: Importing the sample catalog is optional — you can also build this inside your existing catalog)

Setup
Step 1: Create a new "Booking Pathway" for your Multi-Service events
- Go to "Catalogs" in the main menu
- Click the Catalog you want to edit to "Manage Catalog"
- Click the "+ BOOKING PATHWAY" orange button at the top of the page
- Enter the "Name / Headline" for your new pathway option
- Select a "Pathway type" (as you see fit)
- Select customer types this pathway is for (as you see fit)
- Add a "Summary" to describe your new pathway
Step 2: Select your Publishing Options
- Click "Publishing Options" in the left sidebar menu of the popup Editing Booking Pathway window
- Make sure the check box is checked for "Published (selectable by client)" so that your new pathway will appear on your live booking form when you are done
- Enter the display sequence so that this pathway appears in the right spot on your list of services. (you can always change this later)
Step 3: Configure the display options for your new pathway
- Click "Configuration" in the left side bar menu of the popup
- Make any/all adjustments as you see fit
Step 4: Add a Package to your pathway
- Next step is to add a single package to this pathway. Simply navigate to your Catalog in your PPM admin and hover over the new service you've added. A "+ PACKAGE" button will appear. Click to add a new package.
- Give the package a simple name, like "Custom Event", or "Large Event", etc.
- By creating only ONE package for this pathway, it will be auto-selected when the pathway is chosen by your clients.
- Click on "Package Options" in the sidebar menu to create a list of services for your client to choose from
- Click the "+ PACKAGE OPTION" button, then create a separate 'Package Option' for each different service you offer (see sample settings in image below)
- Click "Choices" in the sidebar menu
- Click the "+ CHOICE" button to add a choice for each option you offer for this particular service. (see sample settings in image below)
⚠ NOTE: If you haven't already, it is recommended that you first create an Asset for each service type you offer. This will allow you to add an image to the choice, and will also enable you to run reports to see which events have booked this particular service.
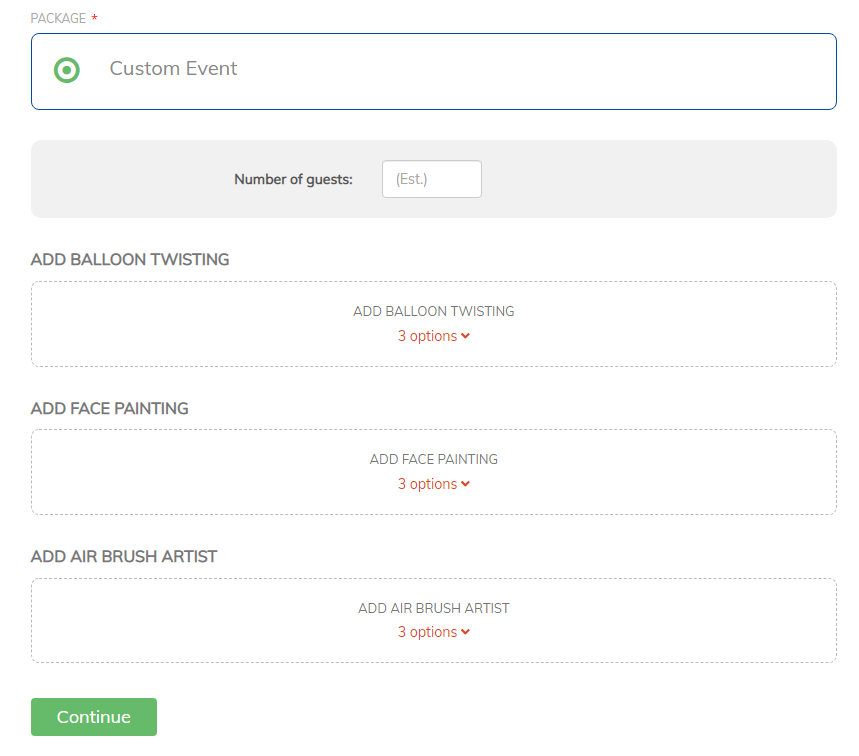
- After we've set up all of the advanced options for the Balloon Twister Package Option, it looks like this on our booking form
- Repeat this process for all service types you'd like to add to your booking form, first creating a Package Option, and then all the respective Choices needed.
Ongoing Admin
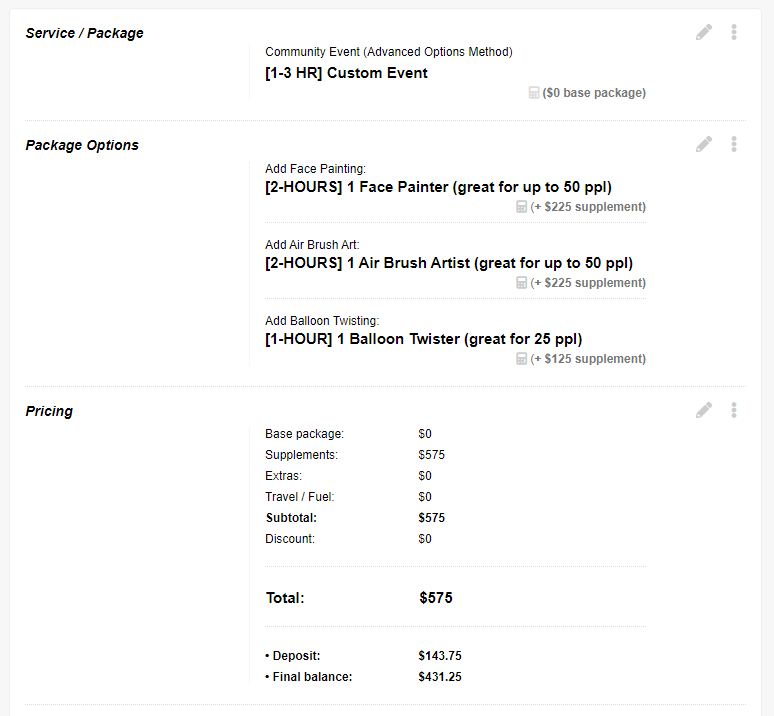
Let's imagine a request has come in and the client has selected "[1-hour] 1 Balloon Twister", "[2-hour] 1 Face Painter", and "[2-hour] 1 Air Brush Artist" from the advanced options you provided...
Here's how you'd handle the "Pathway / Package" and "Pricing" sections for the event within the PPM Admin area:
- Pathway / Package
- Keep it as is. That was easy :)
- Pricing
- You can mostly keep it as is 🙌 Simply, add any other specific entries to the Pricing Grid that are applicable (e.g. Travel Fee, Discount, Deposit, etc)
- Other Info
- Only add notes if you feel it is necessary 👍
That covers all four methods you can use to book Multi-Service Events in Party Pro Manager 🎉