


PPM Autopilot allows you to automatically send emails and SMS/text messages to your clients, your staff, and even to yourself at key points in the event planning process.
Autopilot 2.0 (launched May 2025) introduces major upgrades to the system, including:
More powerful triggers
Multi-action automations (for PLUS and UNICORN plans)
SMS/text support (with the SMS Power-Up)
Flexible timing options
More control over who receives what, and when
Whether you're on a Solo or Team plan, Autopilot helps reduce manual tasks, improves communication, and ensures nothing slips through the cracks.
Step 1: Set up your Autopilot Automations
What can you automate?
Autopilot Automations are designed to help you do things like:
Remind clients about upcoming payments or event details
Send instructions or reminders to staff
Get notified yourself when key event dates are approaching
Follow up after events
Each automation is triggered by a key event-related date, and can send one or more communications to different recipients.
How to create an Autopilot Automation
Go to Settings > Autopilot Automations
Click the orange "+ AUTOMATION" button
Make sure the "Automation Status" is set to ON
Choose whether to activate your automation automatically, with a prompt, or manually
Set the Timing:
Choose the trigger date (e.g. Event Date, Deposit Paid Date, etc.)
Choose how many days before or after the date (must be between 1-30)
NOTE: Autopilot is designed for transactional, event-related messages (up to a max of 30 days after the event)
Add one or more Actions (users on the LITE plan can only add a single action. PLUS and UNICORN plan users can add multiple actions)
- EMAIL
- to client
- to staff
- to self
- SMS/text message
- to client
- to staff
- to self
- EMAIL
Select which event statuses this automation should apply to
Click Save & Close
And, of course, you can edit or delete automations at any time.

Available Trigger Dates
Event Date
Balance Due Date
Deposit Paid Date
Balance Paid Date
Confirmation Deadline
Client Approved Date
Available Action Types
Each automation can include:
Email to client
Email to staff
Email to self
SMS to client (requires SMS Power-Up)
SMS to staff (requires SMS Power-Up)
SMS to self (requires SMS Power-Up)
Each action uses a Standard Text template from your account.
Feature Limits by Plan
| Plan (solo and team) | Automations | Multi-Action | SMS Support (w/ Power-Up) | Triggers |
| LITE | 3 | ✖️ | ✅ | All |
| PLUS | 5 | ✅ | ✅ | All |
| UNICORN | Unlimited | ✅ | ✅ | All |
Step 2: Activate / Deactivate Automations for a Given Event
Once you've created your Autopilot Automations in Settings, you'll still have full control on an event-by-event basis.
This allows you to review and decide which automations should run for each specific event - especially helpful if you're testing or want to customize communications based on event type or client.
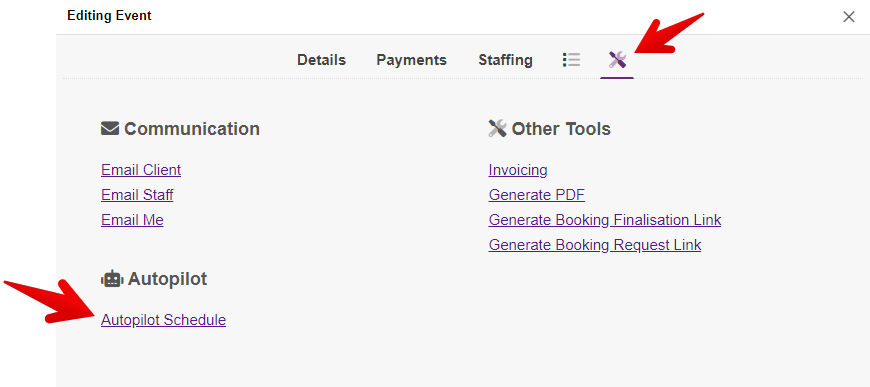
🔍 How to Access the Autopilot Schedule for an Event
- To access the Autopilot Schedule for a given event, open the Event Editor and navigate to the Utilities Section, then click on "Autopilot Schedule"
- In the "Future Automations" section, select all the automated emails you would like to trigger for this particular event
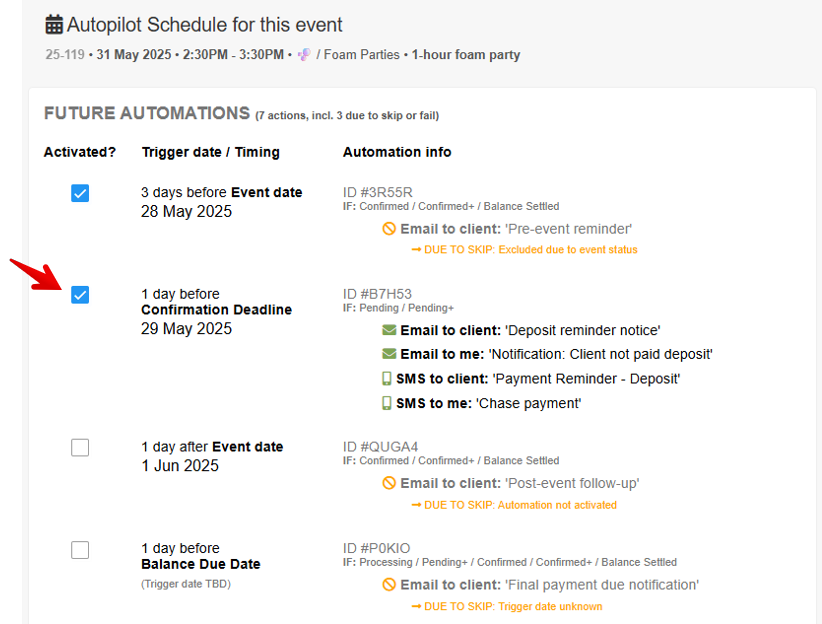
- It's good practice to scan the "Automation Info" column for any warnings about possible Failures or messages currently scheduled to be skipped.
💡PRO TIP!
When you are first getting started with Autopilot automations... instead of going through your event list or calendar to enable automations for one event at a time. You may find it easier to work from the Global "Future Automations | due to skip or fail" list. See Step 3 below to learn how to access this list 👇
Step 3: Reviewing your Global Autopilot Schedule
Want to see all of your upcoming and past Autopilot automations - across every event in your account?
Just go to: More > Autopilot Schedule
This will take you to a full overview of your automation history and what's coming up next.
- Here you can choose between the following views:
- Future automations → Actions currently due to trigger
- Future automations → Actions currently due to skip or fail
- Past automations → Triggered actions
- Past automations → Skipped or failed actions
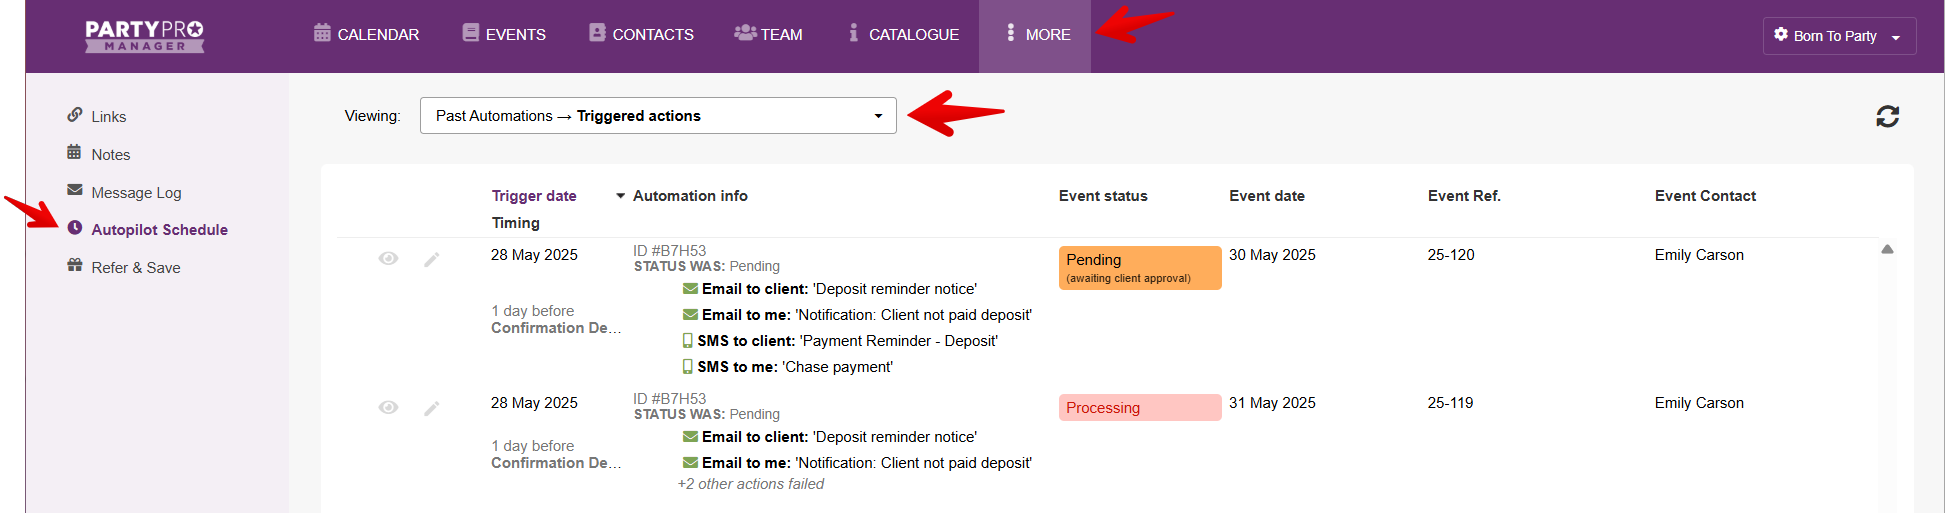
👉 Learn how to use this list to activate new automations for existing events.
Other Automations
PPM handles a lot of the busywork behind the scenes — automatically updating event statuses, sending reminders, and keeping everyone informed.
But there are also several other powerful automations you can configure to match your preferred workflow. These aren’t set up in the Autopilot Automations section, but they’re just as helpful for saving time and reducing errors. These automations help tie your whole workflow together, and when used alongside Autopilot, they make running your party business even smoother.
Here are a few areas you can explore and fine-tune:
💳 Client Payment Automations
Automatically send emails to clients when they pay a deposit or their final balance - with the option to customize what gets sent. These are now configured at Settings > Pricing & Payments.
➡️ Learn more about Client Payment Automations
💰 Default Payment Settings
Want to set a standard deposit amount, sales tax rate, or default payment schedule for all new events? You can configure those defaults to save time during booking.
➡️ Learn how to configure your default payment settings
👥 Staff Scheduling Automations
Choose your preferred gig invites templates (email, SMS, or both), whether client details are shown by default, and set the default gig status of new staff gigs.
➡️ Learn how to customize your staff scheduling automations
⚡ Instant Booking Request Notifications
When someone submits a booking request or inquiry, PPM instantly notifies the client that you've received their request via email (and on screen) - and you can customize how that looks and feels.
➡️ Learn how to set up your instant booking notifications
💡 For even more automation tips and ready-to-use workflows & templates, head over to our Automation Hub!